Wednesday, December 30, 2015

How to Get a Good Deal on a Used iPod touch


Buying a used iPod touch is an appealing idea for the thrifty tech enthusiast. It promises to deliver a powerful and fun gadget while also saving money. But is it worth it? A lower price isn't necessarily a good thing if it means you're getting a device with problems. If you’re considering buying a used iPod touch, follow these tips to make sure you get a good deal.

Don't Buy Anything Older Than One Generation Back

The world of technology moves fast, so fast that even a low price isn't a good reason to buy an iPod touch that's too old.

The current iPod touch is the 6th generation. The 5th generation was released in 2012, while the 4th generation model was released in 2010, the same year as the iPhone 4. It wouldn't make any sense to buy an iPhone 4 these days; it's just too old. The same is true for the iPod touch.

Apple updates the iPod touch much more slowly than the iPhone, so the gap in terms of features, speed, and storage capacity between each model is much bigger than between iPhone models.

Buying more than one generation back could save you extra money, but it also means that the touch you buy will be less powerful, less useful, less fun, and more likely to start encountering hardware problems and software incompatibility sooner.

What to Look For with a Used iPod Touch

Here are some details to look out for when you're buying a used iPod touch to make sure you aren’t a penny wise but a pound foolish.

  1. Features—As I mentioned earlier, the gap in features between one generation touch and the next can be huge. When shopping for a used iPod touch, make sure that you understand what features the model you're considering has and which ones it lacks compared to the latest version. It may not be worth it to save a few dollars if you lose cool, new features. 
  2. Seller's Reputation—Checking out a seller's reputation is a good way to ensure you don't get scammed. Sites like eBay and Amazon make it easy to see how other people who have bought from that seller have liked their transaction. If you're buying for a company, do a web search for complaints about it. 
  3. Battery—The battery on an iPod touch will last a few years if treated well. After that, battery life starts to decline and you'll have to pay for battery replacement. Ask if the seller is willing to certify or replace the battery with a fresh one (something repair shops can do) before you buy. Otherwise, you may end up paying extra for your "cheap" iPod touch sooner than you expected.
  4. Screen—With its touchscreen interface, the condition of a used iPod touch's screen is key. If it hasn’t been kept in a case, the screen may be scratched, which can interfere with watching video, playing games, or browsing the web. Get a look at the screen of the used iPod touch you’re considering, even if it’s just a photo.
  5. Capacity—Lower prices are appealing, but you should always buy as much storage capacity as you can afford. You'll fill it with music, videos, apps, and photos. Don't buy anything smaller than a 32 GB model; the iOS takes up so much space that models with less storage don't leave much room for your data. 
  6. Warranty—If you can get a used touch with a warranty—even an extended warranty you pay extra for—do it. You can’t get this from an individual selling their old iPod, but if you’re buying it from a company, you may be able to get one. Spending the extra money now could save on repair costs later.

Where to Buy a Used iPod touch

If a used iPod touch is right for you, you've got a lot of options for where to buy it:

  1. Apple—Apple sells refurbished iPod touches at the online Apple Store. Expect to save a few bucks and have the experts making sure the device works properly. Even better: refurbished Apple products usually include a limited warranty. Not a bad combo.
  2. Used Electronics Retailers—Companies like NextWorth and Gazelle buy and sell used iPods (and iPhones and other devices). With a thorough inspection process, you can feel confident that you're getting a dependable device. Check out my comparison of these companies and reader reviews of them.
  3. iPod resellers—A handful of companies that sell new models also sell used iPod touches (often at prices close to Apple's). Check out sites like Small Dog Electronics andPowerMax if you want to go this route.
  4. eBay/Craigslist/Amazon—eBay, Craigslist, and Amazon are great places to find bargains online, but beware. Buy from an established company or seller with a good reputation to avoid trouble.
Source: about.com

Read more:

Tuesday, December 29, 2015

10 Reasons Why You Should Jailbreak Your iPhone


Jailbroken devices are free from the shackles of Apple’s “walled garden,” meaning they can run software do things that are normally not allowed. Jailbreaking is perfectly legal and it unlocks some pretty cool capabilities for your iPhone. Take a look at what jailbroken phones can do – maybe you’ll want to liberate your own device.

The political “do it because it frees you” reason

Some people take offense at the fact that Apple retains control over your phone after you buy it. It’s just a phone, and you own it. Shouldn’t you be able to do anything you want with it?

Access to the Cydia app store

A number of independent developers contribute software to Cydia, the special app store for jailbroken iPhones. Because these phones can run whatever software the user wants, an impressive number of new capabilities can be bestowed upon a phone (as you’ll see).

Turn your phone into a mobile hotspot for free

Wouldn’t it be great to get a WiFi iPad to your phone’s 3G connection? A jailbreak app called MyWi is exactly what you need.

Use custom themes

Some people will want to trade in iOS’s simple appearance for something more complex or interesting. A number of jailbreak themes are readily available for them.

Teach Siri new tricks

We’re not the biggest fans of Siri (we even made a list of 9 things we wish it could do). But so many jailbreak apps help bring out its full potential — change voices with AnyVoice, teach it to shut down or restart your phone with VoiceUtils, or if you don’t have Siri you can install Sara, a jailbreaker’s alternative.

Use a Swype-style text input

We like the Swype text input method, usually only available on certain Android phones. You can drag your finger over over the keyboard and it recognizes the character you want to type when you change direction. The iSwipe app brings this same functionality to your liberated phone.

Access all your major settings with one button

We love the jailbreak plugin SBSettings, which gives you instant access to all your important settings with nothing more than a double-tap on your home button, though you can configure the menu to appear as a result of any button or gesture combo you like.

Install all 3rd pary iPad apps

There are many excellent applications banned by Apple to hit the App Store for certain reasons. By jailbreaking iPad, you can install and run all these apps without any limitations. Let’s take some great apps for example.

* Download Youtube videos and save to your iPad.
* Backup purchased and jailbroken iPad apps.
* Streaming songs and videos from a Mac over Wi-Fi.
* Capture photos and videos even if the iPad doesn’t have a built-in camera.
* Let you make phone calls, even send SMS text messages.
* Make a category system. Move icons into folders for organizing hundreds of your applications.
* Apple applications syncing. And also transfer files between iPad, computer and other devices.

Turn your iPhone into its own security system

iCaughtU is a jailbreak app will take pictures of whoever attempts to enter the incorrect password to use your phone. You can set it up to email the photos to yourself when it catches a thief. Handy!
Get rid of notifications without unlocking your screen

Ipsum is an app that lets you swipe over notifications to make them go away without opening the app that generated the notification. It’s perfect for people who like to keep a clear Notification Center.

You might be interested:
How to back up your Camera Roll from iPhone and iPad to PC
How to Recover deleted photos from iPhone

Recommend: if you would like to backup your iPhone/iPad/iPod Touch data to the PC, just go here to learn more. Simply download the free version and have a try, it can transfer data between iOS device and PC freely and easily.

How to Free up Space in iCloud

icloud

Apple’s iCloud storage service can be used to stash away photos, videos, device backups, and more in the cloud. The company offers users 5GB of space for free, however because it’s 5GB of space per Apple ID and not per device, you may find yourself running out of space faster than you would like. While additional storage can be purchased from Apple, there are ways to free up space in your iCloud account before shelling out some extra cash.


Check your space

To see how much space you are using, enter Settings on your iPhone or iPad, select iCloud, click Storage, followed by Manage Storage.

Delete old backups

There is a good chance that your backups are taking up most of your space. If you have backups from your old device, say from an iPhone 4 or iPad 2 that you no longer own, you can just go ahead and delete those. Simply click on the backup scroll to the bottom and tap Delete Backup.

Change backup settings

You may also be backing up items that you don’t really need to have saved in the cloud. For me, that includes Safari data (I use Google Chrome instead) and Contacts (I save my contacts to Gmail), but it’s different for everyone. Head to Setting and click on iCloud. From here you can pick and choose which items you would like to be saved to iCloud. If you find something you really don’t care about, flip the switch to off to delete the data. This will also make sure it isn’t backed up the next time you perform a backup.

Alternative photo services

An easy way to free up a lot of space in iCloud is to delete photos from your backups. Instead of having photos stored in iCloud, I recommend using one of the many third-party cloud services that offer even more free space than Apple. My personal favorite is Syncios Mobile Manger , which offers unlimited storage for free. There’s also Yahoo’s Flickr app, Google Photos , Microsoft One Drive, DropBox, and Amazon Cloud Drive.

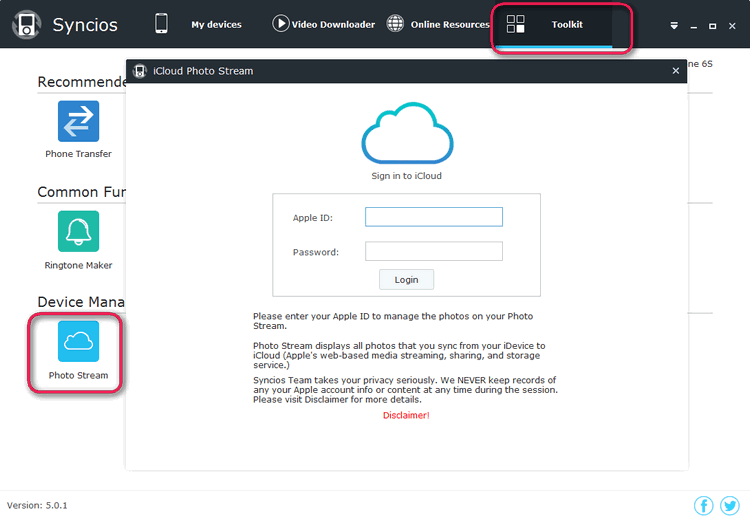
With Syncios Mobile Manger , you are able to download your iCloud photos to PC or iOS/Android device easily. Besides, it enables you to manage, create, delete your iPhone/iPad/iPod, photos and album on computer, one-click backup pictures to computer in batch or selectively.


You can follow Syncios on TwitterFacebook for more tips and tricks.

Sunday, December 27, 2015

How to Migrate Android to iPhone the Easy Way


Changing phone platforms is easier than ever before, and if you’re moving from an Android phone to an iPhone, you’ll find that Apple has made this process incredibly simple with the help of a free migration tool. Appropriately called “Move to iOS”, the utility is easy to use and migrates all contacts, photos, calendars, notes, and much more, transferring everything from the Android phone to the new iPhone.

The best time to migrate everything from an Android to an iPhone is when the iPhone is being setup as new, if you’ve already set it up you can easily reset it to factory settingsand start over, making the transfer process simple. We’re going to work under the assumption that the iPhone is new and being setup as new.


How to Migrate Everything on Android to iPhone with “Move to iOS”

1. Begin the new iPhone setup as usual, when you get to the “Apps & Data” screen, tap on “Move Data from Android”


2. Now on the Android, download the “Move to iOS” app from the Google Play Store and launch the app when finished
3. Tap through the agreements and continue through Move to iOS on the Android app, in a moment an option for verifying the transfer will appear with a code
4. Back on the iPhone at the Move from Android screen, wait for the confirmation code to arrive and enter this code as seen onto the Android phone


5. Choose the items, content, contacts, photos, and other details you want brought from Android over to the iPhone, once the transfer process starts let the Android and iPhone sit still for a while as the migration completes – this process can take a while depending on how much stuff you have and how fast the connection is
6. Once finished, tap on “Done” and continue setting up the iPhone as usual

When the process has completed you should double-check the iPhone Photos app, Contacts, and other places to make sure everything you wanted to copy over has migrated. Move to iOS is quite reliable and works well, so everything should be in order.


Syncios Data Transfer - the best alternative to Move to iOS

Once downloaded Syncios Data Transfer on computer, It will help users securely transfer all of their important data: contacts, messages, call logs, music, photos, videos, apps, web bookmarks, and more from Android device to iOS device. In addition, Syncios Data Transfer backup phone data and restore in lossless quality so that you have no need to worry about losing iPhone data.

What's more, Syncios data transfer tool not only supports transferring data from Android device to iOS device, but also allows you to move from iOS to Android device. Syncios is fully compatible with almost all kinds of Android devices, such as Samsung, HTC, LG, Sony, Google, HUAWEI, Motorola, ZTE, XiaoMi and so on .


Syncios Data Transfer can be more multifunctional than Move to iOS app, which enables user to transfer iTunes library contents into your iPhone and computer as well. In other words, you can transfer songs and playlists from iTunes to an Android phone, iPhone, iPad and iPod touch via Syncios Data Transfer.
Guide on switching from Android device iOS device via Syncios Data Transfer

Firstly, you should download and install the Phone to Phone Data Transfer tool on your Windows PC. Once it is installed, simply follow the steps below.

Step 1: Download and Install Syncios Transfer Tool


Download and install the Syncios Transfer Tool on your PC. Make sure iTunes has been installed on your PC. Please note that you do not have to run iTunes when using this iOS transfer tool.


Step 2: Run the Android to iPhone Data Transfer Tool on your PC


Run the Android to iPhone data transfer tool on the computer. There is three models: Phone to Phone Transfer; Backup to Computer; Restore to Cell Phone. Select Phone to Phone Transfer and simply click Start button to move content from Android to iPhone. You will see the main screen shows connecting devices are required.


Step 3: Connect both your Android device and iPhone

Connect both your Android device and iPhone to the computer with USB Cables. Please wait for a while for the devices to be detected. Android device may need to install drivers. Once detected, the devices will be displayed in the window.

If the phone is not detect, please try the following tips.


Step 4: Transfer everything from Android to iPhone

Please make sure iPhone is in the Target Device pane. (Note: You can switch the device positions by clicking Flip button). The program will load the files on your source Android phone. Once your devices have been detected, all of the items: photos, music, video, E-books, notes, contacts would be checked automatically. If you do not want to transfer some of those items, please just uncheck them and click on "Start Copy". A message is going to be presented to you saying Copying data. After a while, the data you chose will be transferred to your new iPhone.

Important: During the process, never disconnect either phone.

Thursday, December 24, 2015

Anvsoft Spreads Christmas Cheer with 75% off on Star Products


Summary: Anvsoft offers super bargain to video/audio /DVD programs, mobile managers and other multimedia tools on Christmas .


Christmas, a time of giving and sharing. As a global software developer and publisher, Anvsoft is thrilled to share festive cheer with discounts on popular products. This holiday event excludes almost all products which are with a good reputation, in hope to facilitate every aspect of your digital life.


Any Video Converter Ultimate


Being the best-reviewed software in Anvsoft, Any Video Converter Ultimate performs well on Video, Audio and DVD Conversion between different formats. In terms of added features, it also makes excellent experiences for users on downloading, recording and editing videos. 

Any DVD Cloner Platinum

Any DVD Cloner Platinum
With this All-in-one DVD Cloner &DVD Ripper, backing up your DVD movies in flexible modes will be easy: burn DVD to blank DVD disc, copy DVD to DVD folder or ISO files on hard drive, rip DVD to M4V, MP4 and MKV formats for playback on portable players.

iTunes DRM Audio Converter

iTunes DRM Audio Converter
NoteBurner iTunes DRM Audio Converter integrates Apple music, audiobook and M4P to MP3 conversions together, which helps you to remove DRM protection from Apple music, audiobooks and M4P music. It also enables you to convert audio files to MP3, AAC, M4A & M4B at 5X faster speed with ID tags information kept.

Syncios Series

Syncios Mobile Manager
This product series is optimized for iOS & Android Mobile users which offers the best solution on mobile data management.

Syncios iOS & Android Manager supports 12 kinds of data transmission including music, videos, photos, apps, ebooks, contacts between mobile phone and computers. Users are able to manage, transfer and backup phone data at will by one click. Besides, the video conversion, downloading and ring-tone making functions also make the tool more cost efficient.

Syncios Data Transfer provides phone to phone data transmission, Android or iOS devices data backup and restore in just one click.

Syncios Data Recovery is the savior for iOS devices users whose device are broken, water damaged or jailbreak failed and struggling with data loss.


Software like PDF Converter, Photo DVD Maker and Photo Slideshow Maker and more are also engaging in this activity which have a deeper discount. We believe this will be a surprising software carnival that you don’t want to miss!

Get more details from: http://www.anvsoft.com/xmas-offer.html

Wednesday, December 23, 2015

Apple Music VS Spotify


Apple music and Spotify are on the battle to win over users in music market these days. As users, of course, while enjoying the benefits of competition from two giant music supplier, we must stay clear-minded to distinguish which one is right for you. Here, we will make a detailed comparison about Apple music and Spotify including costs, music choice, audio quality, social integration and comparing each of their respective radio functions, in hope to be conductive when you're choosing from them.

Cost

Listening to music is an activity that will shrink your wallet, so cost is the most important thing when you're choosing. Apple Music is currently offering a three-month trial for those who want to test the service before purchasing. Following the trial months, it costs $9.99 per month, with no ads. Spotify has a free option along with ads. For the paid tier, Spotify offers a 30-day trial period, and then equally charges $9.99 per month. At this point, they are very much like.

For family sharing, Apple Music allows you to share music up to 6 users with $14.99 per month. While Spotify requires $5, £5, AU$6 per month per additional user. This depends on quantities of family members that you want to share.


Audio Quality

Apple music and Spotify use file compression to maximize bandwidth as the same as all digital media. In this case, you are able to stream or download music even when your network is not very good. However, The two services use different encoding formats and a different bit rate. Apple Music is streamed at 256Kbps in AAC (Advanced Audio Coding) format, while Spotify offers the Ogg Vorbis format at 320Kbps. At this point, you may think Spotify is better because of the higher number, in reality, you can not judge which one is better simply depending on bit rate.

So, which one is better? That depends on your ears.


Radio

Apple Music Radio lets you listen to Beats 1—Apple’s first ever 24/7, worldwide radio station—as well as handcrafted, on-demand stations curated by a DJ or created by you. All on your iPhone, iPad, iPod touch, Mac, or PC. Music is hand-picked, much like traditional radio, and mixed with content such as artist interviews. Apple is also planning to incorporate celebrity shows, hosted by artists like Drake, Disclosure, St. Vincent, Josh Homme, Pharrell Williams, and Elton John. Spotify has theme-based playlists, as well as radio stations that are generated based on the music of a single artist. How those playlists are made, especially those generated through a request, are unknown. It seems Apple music is slightly better than Spotify on this matter.

Music Library

Apple Music stands tall on this issue thanks to the backing of the whole iTunes catalogue. Currently it's got the biggest library with an estimated 37 million songs in its store. It's also big enough to be able to chase up and offer exclusive albums, such as Dre's iconic hip-hop album, The Chronic, and Taylor Swift's 1989. Spotify is a little behind on that with 'only' 30 million songs in its library for its users to choose from.


Social Integration

Spotify does not only allow for their users to connect with the music that they provide, but also helps them connect with their friends. Spotify allows users to integrate their account with existing Facebook and Twitter accounts. There after they are able to access their friends’/followees’ favorite music and playlists. They also have a seldom used messaging function. Apple Music have planned an entirely new social platform called Connect which is for artists to share exclusive material such as photos, videos, and behind-the-scenes content, all of which fans can interact with by commenting, favouriting or sharing. Apple will be hoping that Connect is not a repeat of their failed music-based social network Ping.

Related Product:

Free Music Downloader Software supports 100+ online video sharing sites and 4K UHD video downloading. Download online videos and music from 100+ sites including YouTube, Facebook, Dailymotion, Vimeo, Metacafe, Howcast, Niconico and more.

FOR
  • Forever free.
  • Transfer Android mobile data: Music, videos, photos, contacts etc.
  • Massive free resources: videos, wallpapers, ringtones.
  • Handy toolkit: Audio converter, video converter, ringtone maker, etc.

AGAINST
  • iOS app is a bit clunky
  • Costly 


How to Copy Pictures from iPhone, Camera, or Memory Card to Photos App on Mac


Many Mac users rely on their iPhone as their primary digital camera, but even if you have a separate camera, or use a variety of memory cards stuffed with images, you may wish to copy pictures from any of those devices directly into the Photos app of OS X. Importing images from any camera, iPhone, iPad, Android, or memory card directly into Photos app is really easy, so if you like using the Photos app as your picture management software, you’ll be happy to know that regardless of the device type, it’s a quick process to copy the pictures directly into Photos app with little effort.

Importing directly from a camera or iOS device is convenient for many users and it works very similar to importing images from the file system into Photos app; you simply review the pictures and choose to import them, and it’s done. It’s that easy.

How to Import Pictures Into Photos App Directly from a Camera, iPhone, iPad, Memory

Card

As you likely noticed by now, Photos app opens automatically by default when a camera or iPhone is connected to the Mac by default, but even if you turned that feature off you can quickly import pictures into Photos app very easily, here are the steps:
1. Connect the digital camera, iPhone, iPad, iPod touch, or memory card to the Mac
2. Open Photos (if it hasn’t launched itself already, or if you turned off the auto-open feature)
3. Under the “Import” tab, review and select the pictures you want to import from the camera, iPhone, or memory card, then click on the appropriate action:
  • Import Selected – only import the pictures you have selected by thumbnail into Photos app
  • Import All New Photos – import every new picture into Photos app from the connected device


4. Find the newly imported images in the “Photos” view as usual

It can take a while to import the pictures, depending on how many are stored on the camera, iOS device, or memory card, and the speed of the USB connection if applicable. Just let the process complete so you don’t miss anything.

Remember, when you want to copy pictures from an external device, always go to the “Import” tab in the Photos app, this is where you’ll find the device(s) to copy the pictures from.


Once the images have successfully imported into Photos app, you can clear off the memory card or bulk delete pictures from the iPhone or iPad to free up quite a bit of storage space if you’d like, since the pictures are now stored locally on the Mac.

Note that we’re covering bringing pictures into Photos app directly from an external device here, whether it’s an iPhone or camera or memory card doesn’t matter, as long as the Mac can detect the camera and pictures it will be an import option. If you already have the pictures transferred to the Mac through another application like Preview or Image Capture and stored in the file system but now want to bring those into the Photos app, you can simply import those image files into Photos app without having to pull them from the camera or device again.

Source: OSXDaily, Syncios