Monday, November 30, 2015

How to Remove Devices From Your iTunes Account


Limits suck. In a world of almost unlimited digital content — all the videos, music, texts, and storage you need at a click — bumping up against restrictions feels like being pulled over by the cops when you weren't even speeding.

Apple has one of the silliest restrictions around: You can only associate 10 devices with your iTunes account — including just five computers. This Draconian rule is a holdover from the early days of the iTunes Store, when Apple had to make accommodations to the rights owners to make sure you didn't share a movie or album with all your friends.

We can only hope that the kings from Cupertino will revise their policy soon. Until then, here's how to remove devices from your iTunes account when you hit the limit.

Remove a Computer

It's simple to remove a computer from your account — as long as you still have access to the computer in question. On the computer you want to remove:

1. Launch iTunes and click "Store" in the menu.
2. Select "Deauthorize this computer." You'll need to enter your Apple ID and password.

If the computer died or you've given it away, your only option is to deauthorize all computers. When you go this route, you'll have to re-authorize the computers you still use. You can only use this nuclear option once a year, so it's better to deauthorize individual machines when you can. To do that, follow these steps:

1. Launch iTunes and click your name. Select "Account Info" from the drop-down menu.
2. Sign in with your Apple ID and password.
3. Under Apple ID Summary, the last item tells you how many computers are authorized for this account. To the right of this you'll see the "Deauthorize All" button.
4. Click the button and confirm that you want to do this. Now you can authorize up to five machines again.

Remove an iOS Device

If you've enabled automatic downloads, used Family Sharing, or a few other features on an iPhone, iPad, or iPod Touch, you had to associate the device with your account first. If you reach the 10-device limit, you'll need to remove some to add more.

1. Launch iTunes and click your name. Select "Account Info" from the drop-down menu.
2. Sign in with your Apple ID and password.
3. Under iTunes in the Cloud, the first item is "Manage Devices." Click the link next to this.
4. You'll see a list of devices associated with your account. The ones you haven't used recently will have a "Remove" button that you can click. If you've used the device with this account within the past 30, the button won't be clickable.

To make the whole thing even more confusing (and frustrating), you might find a completely different list of devices if you look on your iOS device's iCloud settings. That's because your iOS device is showing devices that are currently using your account, while the iTunes list shows devices that are authorized to access downloads, Family Sharing, and other features that require iTunes authentication.


Source: Yahoo

Related:

Sunday, November 29, 2015

Rumor suggests the iPhone 7 will ditch the headphone jack


The standard 3.5-millimeter headphone jack is everywhere—from computers to smartphones to stereo equipment to that Walkman from 1987 sitting in your closet. But if a new rumor is to be believed, your next iPhone might not have one.

According to the Japanese tech site Mac Otakara, Apple is planning to cut the ubiquitous 3.5mm headphone jack in the iPhone 7, opting instead for Lightning-based headphones. According to Mac Otakara, the removal of the headphone jack appears to be part of an effort to further slim down the iPhone: The site claims the next iPhone will be a full millimeter thinner than the current model, the iPhone 6s.

Mac Otakara also says that the new iPhone will come with Lightning-based EarPods, and will support third-party Bluetooth and Lightning-based headphones. If you want to use 3.5mm headphones, you’d have to rely on an adapter dongle of some sort, the report states.

Signs point at ‘maybe’

While it’s a good idea to remain skeptical of any rumor, there are a couple indications that this one might be for real. MacRumors characterizes Mac Otakara as “often-reliable,” which would seem to give this latest rumor some credence. And as MacRumors notes, Apple introduced the MFi specification for Lighting-based headphones last year, so Apple may have been laying the groundwork for transition away from the headphone jack for a while.

Apple also has a long history of dropping older technology in its products, either to make room for new features or slim down its gear. The original iMac, for example, lacked a floppy drive, but it helped popularize USB. More recently, the 12-inch Retina MacBook ditched almost all ports in favor of a headphone jack and a single USB-C port.

It’s important to note that Apple wouldn’t be the first smartphone maker to drop the headphone jack—the HTC G1, the first Android-based smartphone, also shipped without a headphone jack. But given Apple’s size, influence, and market position, shipping an iPhone without a headphone jack might push other manufacturers to follow suit.

Such a development may lead to a fractured headphone market, but it’s also possible that Apple has other, bigger plans for the Lightning connector. Only time will tell.

Source: Macworld


Thursday, November 26, 2015

How to Enable Dark Mode on Mac OS X


Enabling Dark Mode on the Mac is a subtle user interface change to make which allows both the menu bar and the OS X Dock to appear as black backgrounds with white text or icons overlaid on top. The result is a higher contrast menu bar and Dock, which is also a little less intrusive visually than the default light grey menu bar and Dock, and the dark menu and dark Dock will appeal to some users for a variety of reasons.

Enabling (or disabling) Dark Mode is really easy in OS X, and this will impact how the Dock appears, all menu bars, menu bar items, and menu bar dropdowns, as well as the appearance of Spotlight on the Mac.

Enabling Dark Menu Bar & Dark Dock Mode in Mac OS X

1. Open System Preferences from the  Apple menu and go to “General”

2. Near the top of the preference pane check the box for “Use dark menu bar and Dock” to enable Dark Mode

You’ll instantly see the change in the menu bar at the top of the screen.


Pulling down a menu bar item reveals additional dark mode theming:


And the Dock at the bottom of the screen will appear against a transparent dark background rather than a transparent light gray background:


Some users may find the light text to be challenging with transparency, so disabling that or enabling Increased Interface Contrast can remedy that.

Disabling Dark Mode in Mac OS X (the Default)

1. Return to System Preferences from the  Apple menu and go to “General”
2. Uncheck the box for “Use dark menu bar and Dock” to disable Dark Mode and use the default light menu bar and Dock

This returns to the default settings of light mode in OS X, visible in the menu bar:


Light mode default settings are also visible in pull down menus:


And the default light mode also offers a much brighter Dock on the Mac.


The video below demonstrates the appearance with dark menu and dark Dock being toggled on and off:

Though most users will likely want to keep the setting enabled or disabled, if you switch things up often you can use a keyboard shortcut to toggle Dark Mode off and on at any point from anywhere in OS X too.

The Dark Mode feature is only available in OS X 10.10 and later, including OS X El Capitan. Perhaps it will expand in future versions to encompass more user interface elements including windows, titlebars, much like exists in the Photos app editing UI, but for the time being, it’s limited to the menu, dock, and Spotlight.

Source: OSXDaily

Recommended:
3 Ways to backup iPhone/iPad/iPod Touch on Mac

Wednesday, November 25, 2015

Apple’s Holiday 2015 Ad: “Someday At Christmas” with Stevie Wonder and Andra Day


Apple has started to air their annual holiday TV commercial for the 2015 season. This year the advertisement features musical legend Stevie Wonder singing a duet of “Someday At Christmas” with singer Andra Day and a family with their friendly dog, along with subtle but clever displays of various Apple products being put to use.

The commercial is 90 seconds long and has been embedded below for easy viewing. It starts off with Stevie Wonder using the VoiceOver Accessibility feature bundled with the Mac along with the OS X application Garageband to get the Christmas track ready.


The official Apple YouTube channel includes the following brief blurb with the advertisement: “From our family to yours, Andra Day and Stevie Wonder perform his 1967 holiday classic, “Someday At Christmas”.”

While some years Apple has aimed for tearjerkers and tugged at the heart strings with varying degrees of emotion, this holiday season Apple has gone a bit softer and warmer, while also demonstrating some of the lesser known Accessibility features of OS X and throwing in a few Apple Watch and iPhone sightings. Look carefully during the scene of a friendly hello from a labrador retriever and you’ll spot an Apple Watch:


The original and complete “Someday At Christmas” song performed by Stevie Wonder in 1967 is also embedded below for you to enjoy:


Happy Thanksgiving, Happy Holidays, and Merry Christmas!

Source: OSXDaily

How to transfer contacts, messages, music, apps, videos, photos, to OnePlus 2?

ONEPLUS 2

The OnePlus Two builds positively on the design of the OnePlus One, bringing with it a more premium and refined style which makes it look and feel like a more expensive handset. Can’t wait to get a new OnePlus 2? Or you have already got it? Wana switch to OnePlus 2 but troubled to move data from old phone to new OnePlus phone?

Now, follow these steps belowed to move everything from old phone to OnePlus 2:

Step 1: Install and run Syncios Data Transfer

Connect your old Android or iPhone and OnePlus phone to computer and launch the Syncios Phone-to-Phone Data Transfer. You will see the main screen shows connecting devices is required.There 3 modes: phone to phone transfer, phone to pc backup, pc to mobile restore. Click the Backup button. Then it would display the the backup list.


Step 2: Transfer content from old phone to OnePlus 2

It will be just a second before the program recognize them. Make sure iPhone is on the left side while OnePlus 2 the right. If not, click “Flip”.

On the middle panel, check data (calendars, text messages, call logs, photos, music, videos, apps, books, bookmarks) to transfer from old Android phone or iPhone to new OnePlus 2 device as your will. Press the blue button “Start Copy” and the details will be shown in the interface. After a while, all of conetent will be saved on your OnePlus 2.


No matter Android or iOS you had, Syncios Data Transfer enpowers you one-click to sync all contents from one phone to the other without any quality loss quickly and safely . It fully compatible with oxygen OS and Hydrogen OS,Android and iOS. Let’s download and check it out.

Read More:

How to Backup and Restore Android Device
3 Ways to backup Android Phone to Computer
iOS to Android Data Transfer
5 Top iTunes Library Managers
How to Backup and Restore Samsung Galaxy S6 Edge

Monday, November 23, 2015

How to Save eMail Attachments on iPhone & iPad Mail to iCloud Drive


The iOS Mail app allows users to save various types of attachments directly to the iPhone, iPad, or iPod touch. This is a great feature that is available in the latest versions of iOS, and for most file attachment, you’ll be able to save whatever the file is directly to iCloud Drive in iOS.

Be sure you have iCloud Drive enabled and visible on the Home Screen icon of iOS if you want to save email attachments there, obviously if the feature is not enabled you would not be able to save anything there, and without iCloud you wouldn’t have access to the saved files and documents anyway.

How to Save eMail Attachments from Mail to iCloud Drive in iOS

This approach will save any email attachment from Mail in iOS directly to iCloud Drive, where it will be accessible from iPhone, iPad, or iPod touch in the associated app, or with an app that can open files from iCloud:

1. Open Mail app and then open an email with any type of attachment (zip file, doc file, Pages file, Numbers file, txt, rtf, etc)


2. Tap and hold on the attachment icon that appears in the email body, it’s typically the name of the attachment file and shows a small icon of the attachments file type*


3. Choose “Save Attachment” with the iCloud icon, this saves the email attachment to iCloud


4. Choose the iCloud Drive folder destination to save the email attachment to


Now the file has been saved from the email directly to iCloud Drive, which is accessible anytime from the iPhone, iPad, and iPod touch home screen using the accompanying iOS app.


This has been confirmed to work with just about every file type that has been attached to an email, from zip archives, jpeg and png images, psd files, pdf files, doc files, Pages and Numbers documents, you name it and you can likely save it to iCloud from Mail app in iOS.

As we’ve discussed before, using iCloud Drive in iOS kind of works like a file system for the mobile devices, and as long as the iDevice is connected to the internet you’ll be able to open, view, and edit the files stored in iCloud, whether they’re saved email attachments or whatever else you’ve kept or copied to there.

* Note if you do not tap and hold on the icon, you’ll wind up in the Preview / Quick Look screen for the attachment instead. You can also save email attachments from this screen, but curiously the iCloud option is missing when you attempt to save an attachment from the iOS Quick Look screen, and instead you’d need to save to an application like iBooks.

The tap and hold the attachment trick is pretty similar to saving images from Mail, except that being able to save pictures has long been supported in iOS, whereas being able to save other attachments is relatively new. Additionally, being able to save the attachment, whatever the file type, images included, directly to iCloud Drive is only available in the latest versions of iOS, so if you do not see the “Save Attachment” option with the Cloud icon it’s likely because the iPhone or iPad is not running iOS 9.0 or later.

Source: OSXDaily

Read more:
1. How to Back Up iTunes Store Top 10 Podcasts to Your PC
2. How to Transfer Data from Mac to iPad Pro
3. How to Recover Lost Data on iPad Pro

Sunday, November 22, 2015

Two ways to backup and restore Huawei device Ascend Mate 7/8, Honor 4C, Honor 4X, Honor 4A

backup and restore Huawei
Huawei has become one of those Chinese smartphone makers who have established themselves as key players in the global smartphone market. And more interestingly, they have their phones available at every price point. Another reason for achieving a strong foothold is offering great specifications in modest prices.

Two easy ways to backup and restore Huawei device

To avoid your Huawei phone data loss, we recommend you backup your Huawei device as you can. Here are two methods to backup and restore Huawei device (Ascend Mate 7/8, Honor 4C, Honor 4X, Honor 4A) introduced in this post.

Method One: Backup and restore your Huawei device via Huawei HiSuite.

Step 1. Download and install Huawei HiSuite from oficial website:

http://consumer.huawei.com/minisite/HiSuite_en/

Step 2. Connect your Huawei device to the computer, all your data will be listed under the home icon of Hisuite. Simply click Backup & Restore button.


Step 3. Select Backup and clik Next to move forward.

Step 4. Select backup contents and tick the checkbox you need to save, and click “Start”. Once the backup finished, simply click “ok”. Now, you could backup your huawei data to your PC.


To restore your Huawei device, click “Backup & Restore” > “Restore”, select the backup file and click “start”.


Note: all data will be removed and replaced by the previously backup file.

Method Two: Backup and restore your Huawei device via one-click Android Data Transfer Tool:Syncios Data Tansfer.


Syncios Data Transfer just makes it easy and safety. It supports you to backup and restore more than 10 types of data to PC or from Android device with very short time, including: contacts, text messages, calendar, Call logs, music, apps, photos, Ebooks and videos etc.

Download and install the Syncios Android Backup and Restore Tool on your PC and kindly follow following easy steps. You can choose different versions according to your computer’s operation system.

To Backup Huawei Data to Computer:

Step 1. Run Syncios Program and Connect Your Android to PC.


Step 2. Select data to backup.

The following screen will allow you to select which items you would like to back up onto your computer. On the right side of the pane, you will also have the option to change or choose the location of the backup data. Select the […] button that appears beneath the computer icon and select the location where you would like all data to be saved. After making sure your data are chosen, click Start Copy button in the middle bottom. During this time, make sure your phone is not disconnected from the computer. When the extracting process is done, you will get the pop up message Copy Completed. Click OK, the backup folder will automatically open.


To Restore Huawei from Backup File:

>> After backup completed, go to the homepage of Syncios and you will see the Restore option. Simply connect your new Android device, then clickRestore. If you would like to move Android backup files to your new iOS device, please connect your iPhone, iPad or iTouch and click the restore button.

>> Now you can select your previous backup files from the left panel . Check data you would like to move to your new Android device on the middle checkbox. Click Start button, all of your selected files will be restored to the target device.


Thursday, November 19, 2015

How to Silence Siri with the Mute Switch on iPhone & iPad


The ever helpful and sometimes comical Siri is a rather vocal virtual assistant, defaulting to speaking back a response to directions and commands. But if you want to hush that Siri voice feedback response while still using the feature for commands and queries, you can enable an optional setting that causes Siri to obey the broader iPhone and iPad hardware mute switch.

Muting Siri with the hardware switch is an easy setting to turn on, but it’s a bit buried and worded a little strange, so don’t be surprised if you overlooked it when wandering around in Settings.

Enable Siri Muting & Unmuting with the Hardware Switch on iPhone & iPad

  1. Open Settings and go to “General” then to “Siri”
  2. Choose “Voice Feedback” and select “Control with Ring Switch” (yes, the Mute switch on the side of the iPhone and iPad is referred to as the ‘Ring Switch’ here, but it’s the mute button you know and love)


3. Leave Settings and activate Siri with the mute switch enabled, Siri will respond in text and on screen only, without blabbing the answer to the world

Siri works exactly the same as it did before, but you won’t hear any voice feedback if the mute switch is toggled on, even if you use the Hey Siri command handsfree from afar.


Silence Siri with the Mute Switch

Flipping the Mute switch (or the ring switch, or the silent switch, both of which Apple sometimes calls it) will make Siri completely quiet in responses.


Note that if on iPad you have the mute switch set to orientation lock
Letting Siri Talk Again by Unmuting

Toggling the mute switch again will allow Siri to blab aloud just as you’d expect, perhaps ready to interrupting a press conference or vocalizing opinions and statements out of nowhere again if you’re lucky.


This trick is aimed at a friend of mine who I noticed was actually turning off Siri completely because they didn’t want the voice feedback, a bit overkill and unnecessary if all you want is to read the text on screen rather than having the iPhone or iPad talk back to you. Instead, just enable the switch setting, then you can hush and mute Siri whenever you want, and let Siri talk again when you do want to have voice feedback.

Source: osxdaily

Read more:
How to Transfer Podcast from iPhone to iTunes

Wednesday, November 18, 2015

iPad Pro video review


The iPad goes IMAX in a pro tablet with potential as epic as its screen size.

The iPad Pro is the biggest and most powerful iPad Apple's ever made. At it's introduction, Tim Cook called the iPad Pro the clearest expression of Apple's vision for the future of computing, and it's easy to see why.

Pixels and performance

It starts with the 12.9 inch, 2732×2048 display. That's 5.6 million high-density, Retina pixels. But they're not just pretty, they're smart. There's a custom timing controller, just like on the Retina 5K iMac, and all those pixels are precisely photo-aligned for maximum contrast.


Apple is also introducing variable refresh rate with the iPad Pro. So, the screen can ramp down to 30 Hz when static or boost up to 240 Hz when hit by the Apple Pencil. That's great for performance, it's great for battery life.

Technically, it doesn't have as wide a color gamut at the iPad Air or the iPad mini—chalk the limitation up to panels with this many pixels—but comparing them side-by-side, even in the red and magenta ranges, it's hard to tell the difference.

Guts and glory

There's everything here that you'd expect. Touch ID, an 8 megapixel 1080p iSight camera, 1.2 megapixel 720p FaceTime camera, lightning port, 3.5mm headphone jack, and all in your choice of silver, space gray, or gold, with 32 GB or 128 GB with optional LTE.


Under the hood you've got the A9X chipset. It includes Apple's industry-leading third-generation 64-bit Twister processor and a ton of graphical power. Because Apple designs its silicon to specifically match its software, in many cases it can deliver better performance and efficiency than the x86 processors found in laptops. That includes up to three simultaneous streams of 4K video, which is nuts. It also integrates the third-generation M9 coprocessor that allows for, among other things, "Hey, Siri!" voice activation.

Input/output—I/O—is ludicrously better. Thanks to a new, custom storage controller, the iPad Pro can read and write data better than some traditional computers. That's not just great for 4K video and photos, that's great for everything. It keeps that powerful processor fed so you're almost never waiting for anything to load—you're just watching it pop up ready to use.

There are four new stereo speakers as well. They're machined right into the body of the iPad Pro and give it louder volume and a wider frequency range. Highs go to the top, lows to the bottom and, as you turn the iPad, they turn with you, cross-fading perfectly back into place.

All of this in an iPad Pro that's almost 80% larger and twice as fast as an iPad Air 2, yet weighs about the same as the original iPad.

The software story

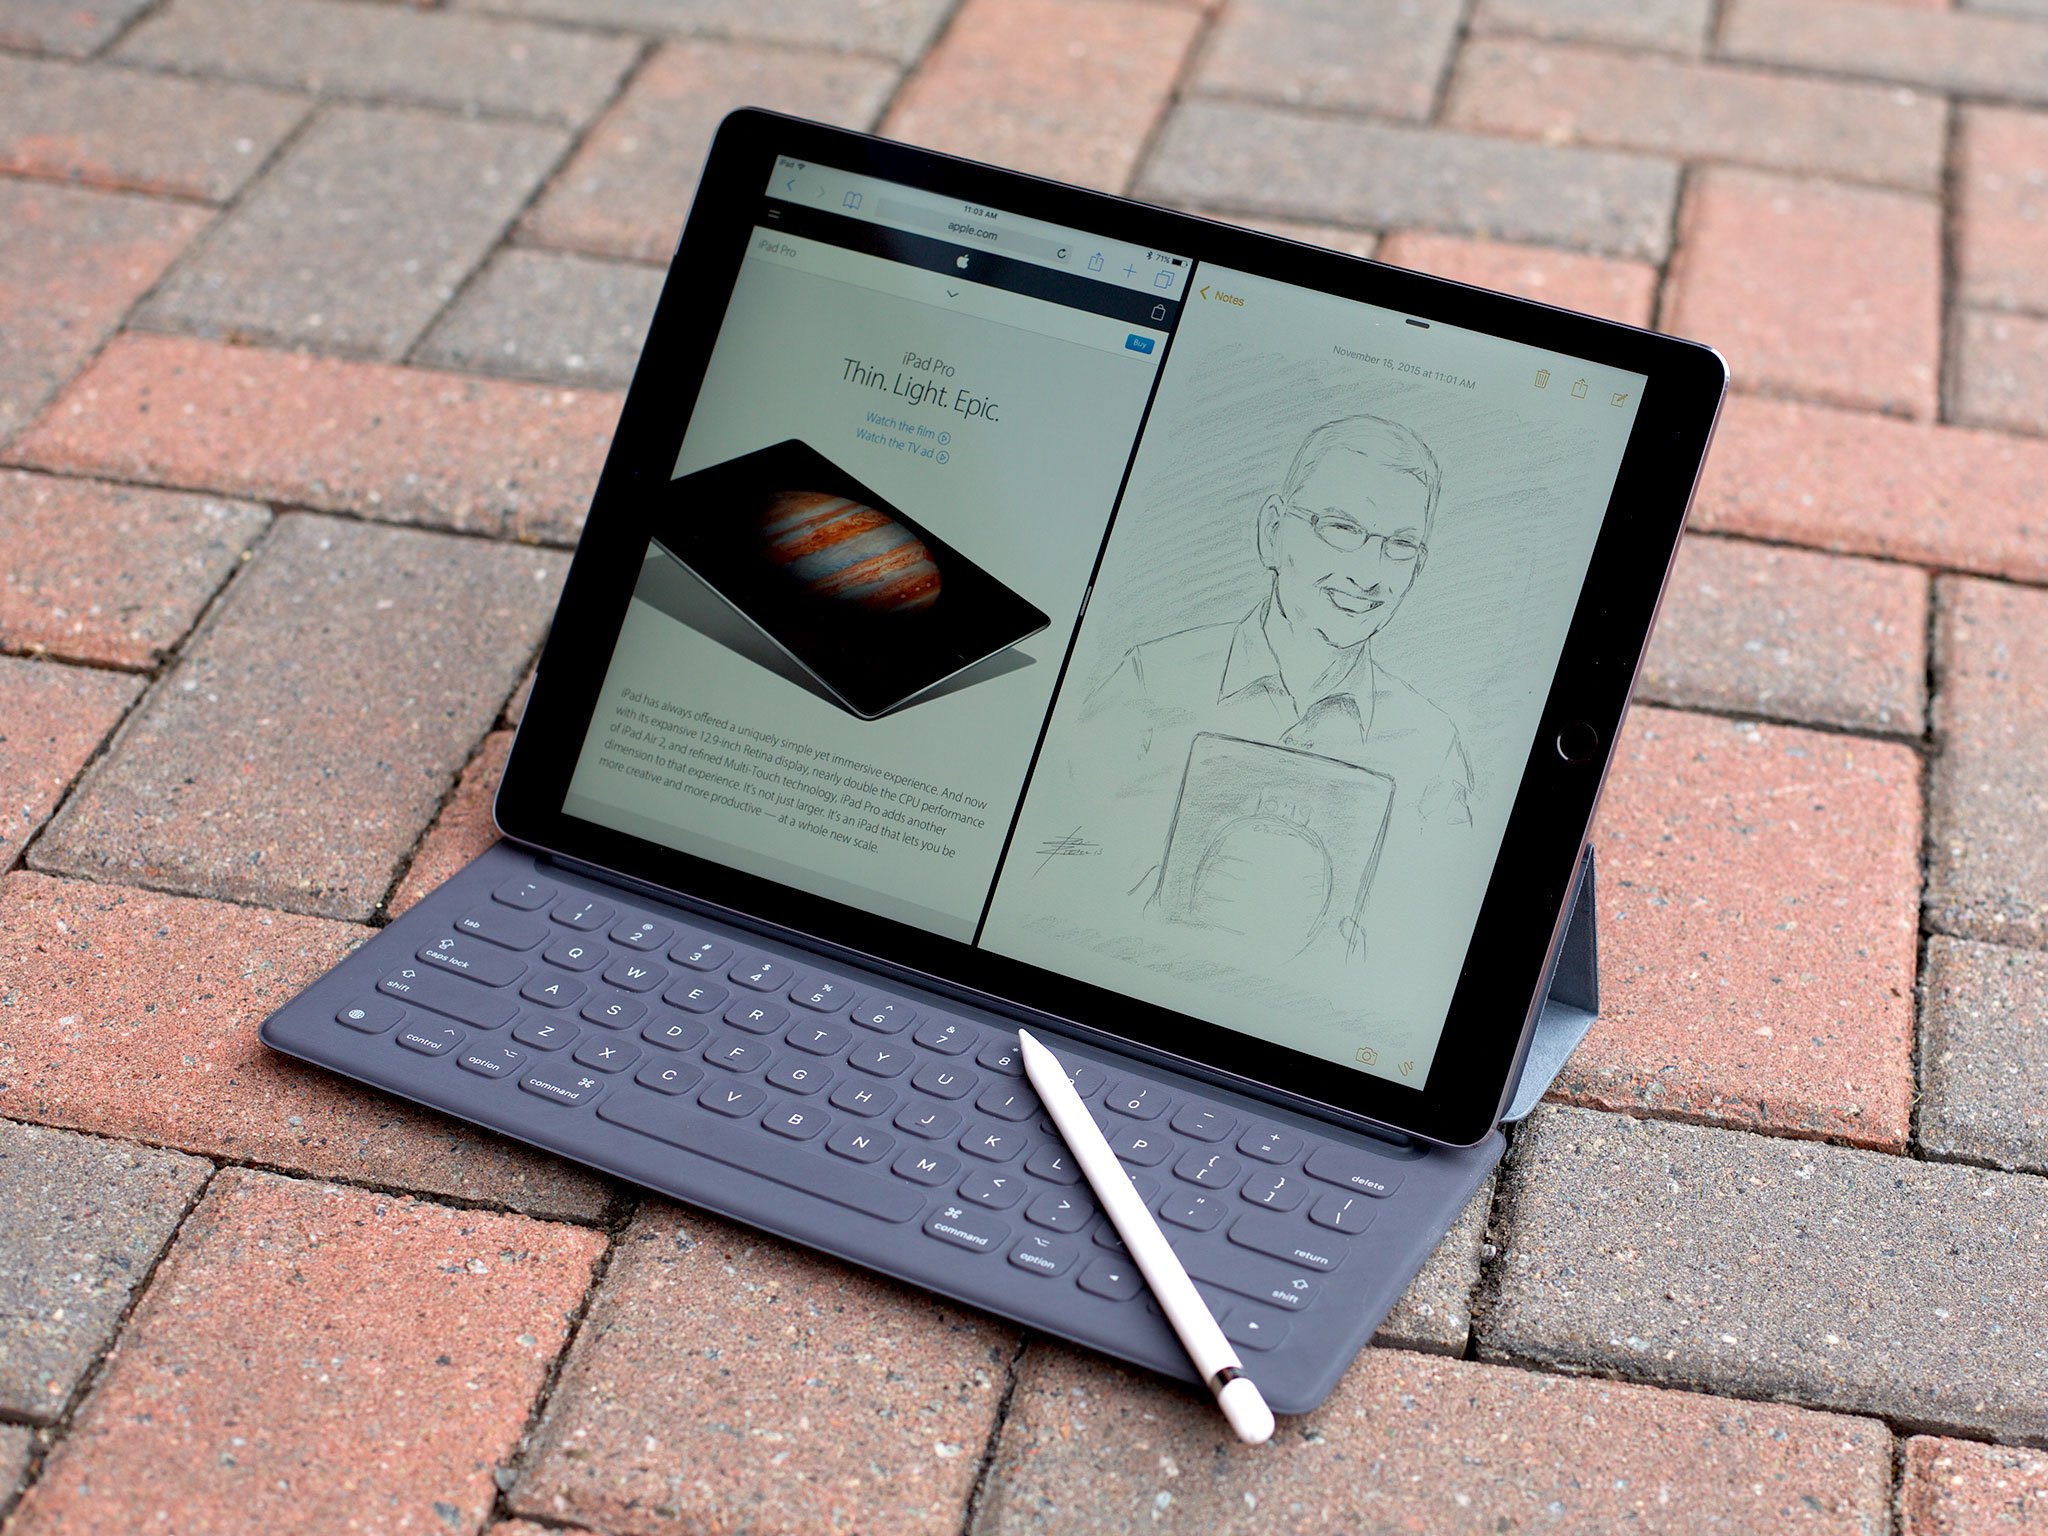
Thanks to the expansive display and 4 GB of RAM, the iPad Pro can run iOS 9 picture-in-picture video, slide over, and split view apps smoothly, and side-by-side at a scale close that rivals the iPad Air full-screen.

It's not perfect, of course. Not a lot of software has updated yet to take full advantage of the big screen, including parts of the operating system itself. I'm still hoping Apple does what they did with the Watch and TV, and give iPad its own version of iOS with an interface really optimized for its power and scale.

Apple Pencil + Smart Keyboard


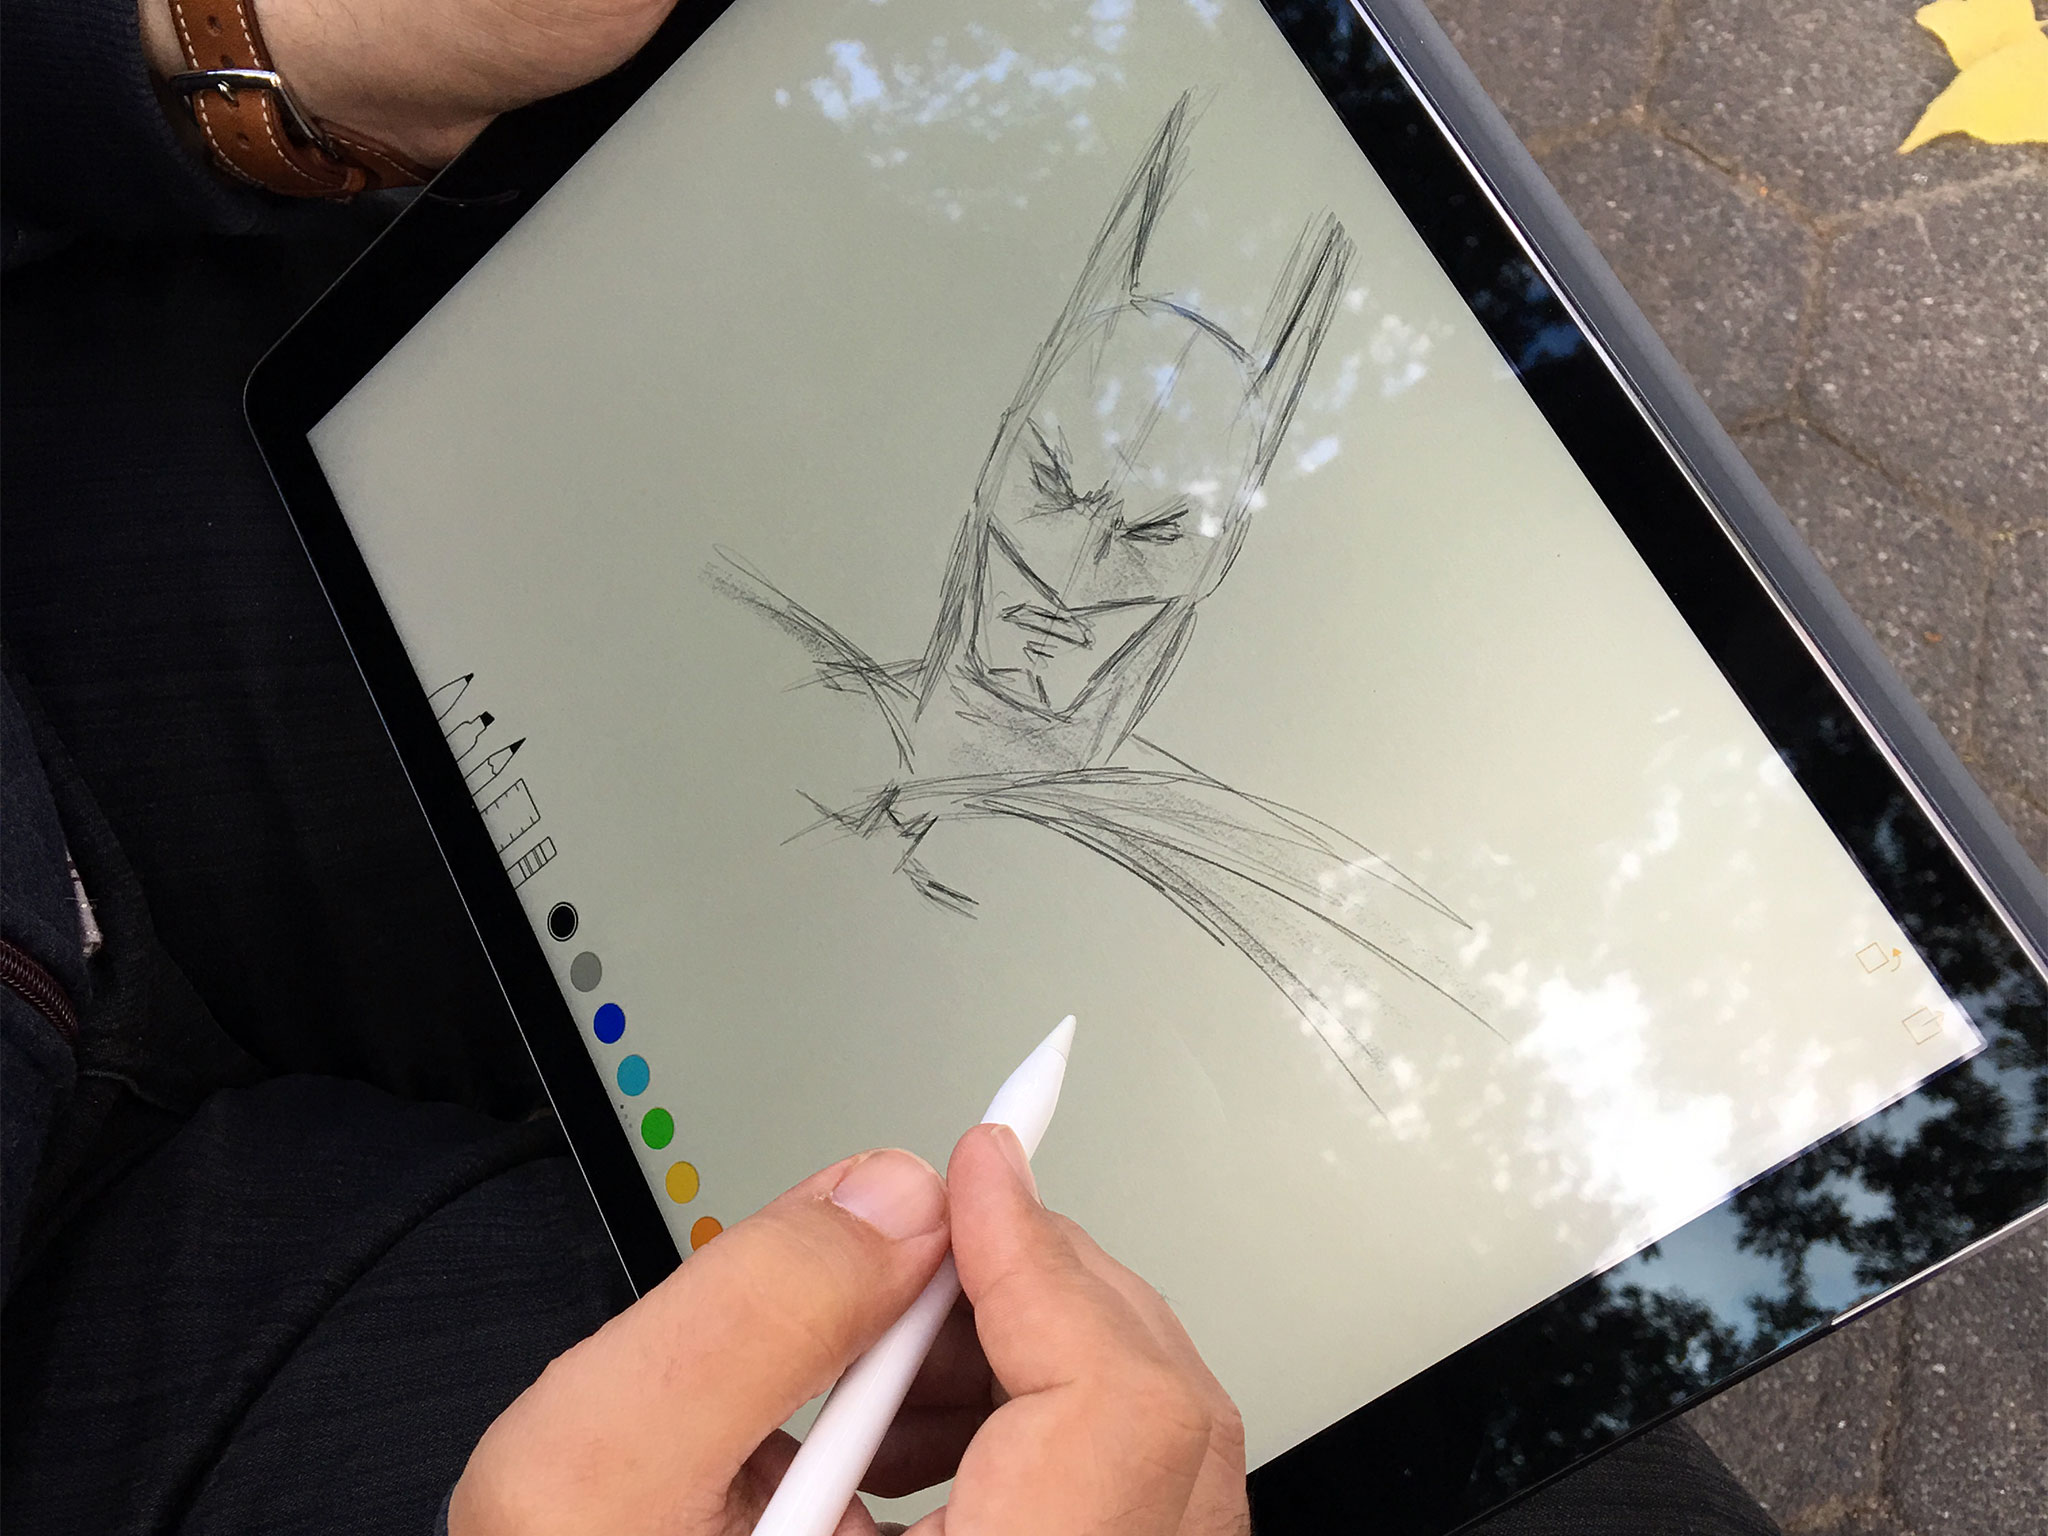
The iPad Pro comes with two new, optional accessories as well. The Apple Pencil is a precision writing and drawing tool that combines advanced technology in its tip and built-in sensors, and in the iPad Pro display, and new frameworks in apps, to produce and amazing results.


Unlike older technologies, there's no air gap and so no parallax when you're working, and its not capacitive so not only can it can produce sharp lines that appear in real time, right in the glass, but it doesn't interfere with multitouch gestures either.

I've been using stuff like this for decades and iPad Pro and Apple Pencil is the closest thing I've ever felt to a real pencil in the digital world.

The Smart Keyboard uses the new Smart Connector on the iPad Pro to create a next-generation hybrid that can type like a laptop without forcing you to use legacy laptop software. It's made from laser-ablated, custom-woven fabric—part taffeta, if you can believe it!—and attaches magnetically and transfers power, data, and ground right through the casing.

The feel is very close to the new MacBook, fast but shallow, and while its thin and liquid resistant, it's also tough and high performance. It took me about an hour or so to get used it, and then I was typing away without a second thought.

It takes advantage of the new external keyboard support in iOS 9, including easy shortcut discovery, command-tab task switching, command-space search, shift-command-h Home screen escape, and more. You can't scroll perfectly or navigate at all with the keyboard just yet, but you have to imagine that's coming next.

(My hope is for some kind of Apple TV Focus Engine inspired navigation system and a capacitive area in the keyboard bezel that transits the iOS 9 keyboard's trackpad mode.)


The transition

Technology doesn't means anything until you get your hands on it, though. That's when it comes alive. Whether it's a killer productivity device for mobile accomplishers, an amazing tool for artists on the go, an incredible portable, personal TV and gaming machine, or simply a computing device accessible and approachable for everyone, that's when you can tell whether it all matters to you or not.

The iPad Pro isn't the ultimate evolution of the original iPad and it isn't the beginning of the end of MacBooks. It's an transition point. It's the moment when tablets that are highly accessible also became highly capable.

If you still want a MacBook with you wherever you go, you might be happier with an iPad mini 4—or if you have big screen iPhone, an iPad Air 2. If you want something else, though, something more personal and approachable than a traditional PC, and something more empowering, then you'll want an iPad Pro.

There are still limitations, there are still caveats. That's the tradeoff when you try to pull the future into the present. But the iPad Pro really is the iPad gone IMAX. It's Apple's biggest window yet into apps and the web, and it's got potential as epic as its display.

Source: imore

Read more: 

Tuesday, November 17, 2015

How to Use Pinned Tabs in Safari for OS X El Capitan


The latest versions of Safari in OS X El 10.11 and later include a pinned tab feature, which allow you to maintain a particular web sites browser tab consistently across Safari relaunching and rebooting of the Mac. Pinned Tabs kind of work like bookmarks in this sense, except that rather than having to show a bookmarks bar, you can simply visit the pinned site through the pinned tab which appears in the same tab toolbar you’d see in Safari when multiple tabs are open anyway.

The pinned tabs are subtle and not intrusive, making them a great way to keep quick access to sites you visit regularly in Safari on the Mac.


There are two ways to pin a browser tab in Safari: 

Pin a Tab with a Drag

Users can quickly pin a tab in Safari with a simple drag and drop trick:
  1. Open a Safari window and open at least one new tab (Command+T will create a new tab), use the URL syncios.com for testing purposes if you’d like
  2. Click and hold the tab you’d like to pin and drag it all the way to the left of the tab bar, release to create pin the tab


The pinned site is placed as a tab in the left side of the Safari tab bar.

Pin Tabs in Safari with a Right-Click

For those who like to use the right-click (or Control+click, two-finger click), you can also quickly pin any browser tab in Safari easily:
  1. Have at least two tabs open in Safari, including the page you wish to pin as a tab
  2. Right-click on the tab you wish to pin and choose “Pin Tab”


The pinned tab will appear on the left side of the tab bar.

If the website being pinned has a custom pin tab icon, it will display here, otherwise it will take the first letter of the website name and use that as the pinned tab icon.

Removing Pinned Tabs in Safari

You can quickly remove pinned tabs from Safari by using one of the following tricks:
  1. Drag and drop the Pinned Tab from the left side of the tab bar away and to the right to change it back to a regular browsing tab
  2. OR: Right-click the Pinned Tab and choose “Unpin Tab”


Pinned tabs are a great place to put websites you visit frequently, like the one you’re on right now, a webmail client, your favorite news source, social networks, or whatever else you visit on a regular enough basis that pinning the web site it to your tab bar is a great place for quick access.

By the way, pinned tabs also exist in Chrome, and work much the same way, so even if you’re not a Safari user, or if you’re not on the latest versions of OS X, you can still gain this feature by using the Google Chrome browser.

Source: OSXDaily

Read more:

Monday, November 16, 2015

How to securely wipe an Android smartphone or tablet


Getting rid of your Android smartphone or tablet, but want to make sure that all your data has been securely deleted? Here's how you go about the task.
  1. Back up all your data; because once it's gone, it's gone. There's no undo button you can press.
  2. Next, plug the charger into the device so it's getting power for the deletion process. This is important because the process can take hours.
  3. Go to Settings > Security > Encrypt phone (or Encrypt tablet) to begin the process on Android 4.4 or lower, or go Settings > Security > Screen lock to begin the process on Android 5.0 and higher (this is unnecessary on new devices running Android 6.0 Marshmallow).
  4. You will be guided through the process. Set a strong password. Don't bother encrypting the SD card because you can pop this out and keep it rather than wipe it. This process can take over an hour, so be patient and make sure you have the time.
  5. Go to Settings > Backup & reset > Factory data reset and then tap Reset phone (orReset tablet).
  6. Once this process is complete your data is gone. Technically, it's still written there on the flash memory in what is now reported as free space, and will eventually be overwritten. Because it's encrypted recovering it would be difficult. However, if you want to completely eradicate it, jump to the next step.
  7. The best way to get rid of the encrypted data is to overwrite it with new data. There are two ways you can do this. You can load some big files onto the device (big video files are ideal for this) until the storage is full up and then delete these files.
That's it! Your data is now gone, and you're safe to pass the smartphone or tablet on.
Source: ZDNet
Recommended:
Free Mobile Manager for iOS and Android
Transfer, Backup and restore your devices data between android and computer!

Sunday, November 15, 2015

Fix “the last backup could not be completed” iOS iCloud Backup Error


For iCloud users with automatic backups configured, the iPhone, iPad, or iPod touch will backup to iCloud every evening when connected to wi-fi. This usually goes without a hitch, but sometimes you may check the iCloud Backup settings to discover a vague message stating “The last backup could not be completed.” You may also see this backup failed error when trying to complete a manual iCloud backup from an iOS device too.

Given how important regular backups are, this error message can be annoying and distressing, but fortunately it’s usually quickly resolved with a few simple troubleshooting tricks.

1: Reboot the iOS Device and Try Again

Before trying anything else, the easiest and most reliable troubleshooting method is simply forcibly rebooting the iOS device and trying to backup to iCloud again when it boots back again.
  1. Hold down the Home button and Power button simultaneously until you see the Apple  logo signifying the reboot has occurred, then let it boot up again as usual, be sure the iOS device is joined to a wi-fi network when it boots back up
  2. Return to Settings > iCloud > Backup > and try “Back Up Now”, it should work

This alone worked for me after an iCloud backup had repeatedly failed with automatic backups and after several attempts to start and finish a manual backup, after a quick device restart and trying again, the iCloud backup was well on it’s way:


A reboot is usually all that is needed to resolve this error and get iCloud backups working again. You’ll want to be sure you’re on wi-fi and that the wi-fi network connection is decent, a poor connection can often be the cause of the error message.

Nonetheless, if you’re still having trouble, there’s a few more tricks to troubleshoot.

2: Delete Old iCloud Backups, Reset Network Settings, and Try Again

If you’re going to do this, you’ll want to backup the iPhone, iPad, or iPod touch to a computer first, because you’ll be deleting the iCloud backup. You don’t want a device that is not backing up to have no backup, so again, only delete the old iCloud backups if you’ve made a new backup to iTunes first:
  1. Connect the iPhone / iPad to a computer with iTunes and backup locally to that computer
  2. When the iTunes backup is finished, back on the iOS device open the Settings app, go to “iCloud” followed by “Storage”, then “Manage Storage”
  3. Locate the old iCloud backup and delete it from iCloud
  4. Clear out network settings in iOS Settings > Reset > Reset Network Settings (this will remove wi-fi networks, meaning you will need to rejoin them)
  5. Join a wi-fi network again from iOS (be sure the wi-fi network works and has sufficient bandwidth for uploads!)
  6. Return to Settings > iCloud > Backup > and choose “Back Up Now”

Tedious perhaps, but backups to iCloud from the iOS device should work again.

Finally, if none of the above is working, you may want to try backing up the device to iTunes on a computer, turning off iCloud, then restoring the device from your newly made iTunes backup, this wasn’t necessary for my particular case but in extremely stubborn “unable to complete backup” scenarios it should resolve the problem once and for all according to iDownloadblog. Yes, restoring can be a nuisance, but not being able to backup an iPhone, iPad, or iPod touch manually to iCloud or through automatic backups is even worse, particularly given the convenience of the auto-backups.

For what it’s worth, a similar error can happen on the desktop with Mac and Windows,where an iTunes ‘could not backup’ error message appears sometimes, usually due to a damaged USB cable or corrupt local backup file.

Why does the “The last backup could not be completed error” appear at all?

It’s difficult to know, but backups can fail for many reasons, sometimes it’s just a matter of a bad network connection, insufficient bandwidth, a network timeout, or, as is resolved in the latter troubleshooting steps here, it may be an issue with the existing iCloud backup too.

If you’ve encountered this error message and fixed it on your iPhone, iPad, or iPod touch with one of the tricks above, or with another method, do let us know in the comments.

Source: OSXDaily

Recommended reading:
How to Sync iPod to a New Computer Freely

Thursday, November 12, 2015

5 Ways to Free Up Space on iPhone, iPad and iPod Touch


A recent class action lawsuit against Apple has brought to light that even if you buy a 16 GB iPhone, you can't actually use all 16 GB of storage. If you've run out of space on your iPhone, or you're trying to update iOS, you may want to free up some storage.

We have listed out 5 simple ways you can manage and release more space on your iPhone:

1. Set your messages to automatically expire

With iOS 8 and above version, you can now automatically delete older messages. If you like going back through old messages, don't go this route. But do you really need those conversations after a year? This option is much easier than manually deleting old threads. Also, you can decide how long your video and audio messages are stored, can set them to expire after two minutes or never.

In order to do that, Go to Settings > Messages > select expire time.


2. Backup photos, music, videos, messages, apps, notes, etc to computer

You don't have to delete all of your most precious files on your phone such as photos, notes, messages, but you might want to consider moving them somewhere else. You can sync your calendar, messages and notes to iTunes, upload photos to iCloud, backup contacts to outlook or google mail. However, it's troublesome and iTunes won't backup several tyeps of data. You need a third-party desktop app - Syncios Data Transfer, to help you backup all of your phone content to PC on one click.

Install this one click backup tool on your computer, click "Backup" > select data to backup > tag on "Start Copy".


3. Delete unused apps

Undoubtedly, applications makes up the largest percentage of phone memory. To remove some useless apps on your iDevice could release considerable internal storage. Navigate to your iPhone, iPad or iPod Touch, tag on "Setting" > "General"> "Usage"> "Manage Storage". Tap an app to view details. Each app in the list will display how much storage space it is taking. You can tap "Delete App" to uninstall the app.


Many gaming apps are small, but there are some that can take up more than 1 GB of space because of 3-D graphics. You can use iOS Manager like Syncios Mobile Manager to orgnize, backup, install and uninstall apps. It shows all apps and app infro on one list which makes you easily to manage your apps, view app documents.


4. Beware of apps' internal downloads

The numbers you see in Manage Storage include how much the app itself takes up combined with the data inside it. Some apps are small by themselves but can store a lot of files.

For example, the Spotify app is only 56 MB. But if you have a lot of music downloaded to your phone, the app takes up a ridiculous amount of space. You can access to the app and erase some app data.


5. Clean out your web browsers history

Clean out your web browsers history, website tabs, cache and cookie data and other downloaded data. While Safari browser has this data stored in the Safari app under the Safari option, other browsers will have this data stored in their own app under the options triple beam bar area of most browser apps. Not only will cleaning this up improve storage space, it will also improve performance.


Any other space-saving tips we missed that have worked for you? Share them below!