Wednesday, February 24, 2016

How to Convert Live Photos to Animated GIFs on iPhone with a Free App


Live Photos are a great new feature for the iPhone camera, and while you can easily share them with other iPhone and iPad users or to a Mac, they come across as little movies unless the user has Live Photo compatible iPhone. Mysteriously missing is the ability to convert and save Live Photos as an animated gif directly from the iPhone Photos app, but with the help of a third party application, you can convert any Live Photo into an animated gif with minimal effort.

Before getting started, take any Live Photo with the iPhone camera that you want to convert if you haven’t done so already (you’ll need to enable the Live Photo feature if you turned it off).

Convert a Live Photo to Animated GIF on iPhone with GIF Toaster

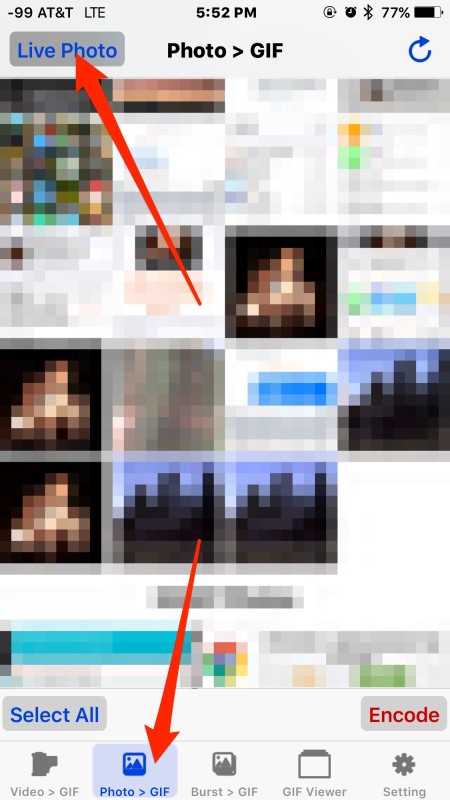
1. Download the GIF Toaster app for free from the App Store for iOS
2. Launch GIF Toaster and tap on “Photo > Gif” then tap on “Live Photo” in the corner to show only Live Photos
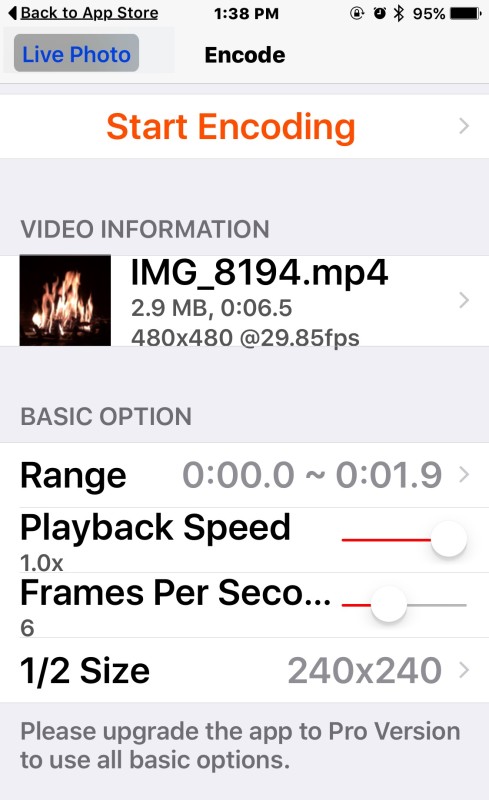
3. Select the Live Photo you wish to convert to gif then tap “Encode”


4. Adjust the GIF settings as desired, including frame rate (FPS), range, playback speed, and the resolution size of the gif (note that higher resolution gifs require the app to be paid for, but more on that in a moment*)

5. Choose “Start Encoding” and when finished, choose “Export to Camera Roll” or “Open In…” to message or email the aniVery easy, here’s a Live Photo converted into an animated GIF of a fireplace that was created with the app.

convert-live-photo-to-animated-gif-free-iphone-app


* GIF Toaster works well but has some limitations and some quirks in the user interface, so while it’s great for limited usage, if you plan on converting many Live Photos to animated gifs, you may want to try some other apps for Live Photo conversions, and the $2 Live GIF app or $2 Lively app are perhaps better choices. Nonetheless, for a free offering, GIF Toaster gets the job done well, and can also convert video to animated gifs as well.

It’s worth mentioning that if you just want to make animated gifs from still pictures or videos, GifMill works great for that purpose as well, which is another free app for iOS we’ve discussed before.Animated GIFs are popular enough that the ability to generate one out of a Live Photo should probably be included natively on the iPhone Camera app or Photos app, perhaps such a feature will arrive in the future, but until (if ever) that changes, enjoy the apps to make your own animated GIFS!

Source: osxdaily

Read more:

Monday, February 22, 2016

How to get Siri to read you any webpage


Siri is full of surprises. She can tell you the weather, launch apps and give you sport scores. She's really funny and can beatbox (sort of).

Over the years, she's gotten smarter and smarter, but here's one really cool trick you may not have known she could do: Read webpages.

There are times when it's more convenient to hear an article than read one. Like when you're driving, cooking or taking a nice warm bubble bath.

Unlocking Siri's webpage reading power is easy. Go into your Settings app and then General > Accessibility > Speech. Turn on the Speak Screen option.

Then open Safari and surf to a web page. Once you're on the page you want Siri to read, swipe down from the status bar using two fingers and a Speak Screen box will pop up, and Siri will automatically start reading you the webpage — ads and all.


To get around Siri reading you ads and other non-content-related text, tap the Reader View button (the one with four lines) in the upper left before using the two-finger swipe to bring up the Speak Screen box.

You can slow down or speed up the dictation by tapping on the turtle and rabbit buttons, play and pause, and go to previous or next paragraph using the rewind and fast forward icons.

Source: Mashable


Read more:
Top 3 Best iPhone Data Recovery Software
3 Ways to backup iPhone/iPad/iPod Touch on Mac
How to Sync iPhone Contacts with Windows 10 People App

You can follow Syncios on Twitter,Facebook for more tips and tricks.

Sunday, February 21, 2016

Play music from your iTunes library without opening iTunes


My iTunes library sits untouched for long stretches of time. Part of the reason is I primarily use streaming services to listen to music these days, but part of the reason is iTunes itself. I just don’t like using the once-great, now-bloated application.

If you have a particular song buried in your iTunes library that you want to hear, there is a way to play it without touching iTunes. Let iTunes continue its slumber and instead turn to Spotlight search.

Open Spotlight by clicking on the magnifying-glass icon in the menu bar or by hitting Command-spacebar. Search for the song you want to play and in the results panel on the right you will see information about the song plus an album cover. Mouse over the album cover and you will see a play button. Click it to play the track.


You can close Spotlight and go about your business, and the song will continue to play. You can return to Spotlight, where your search query will remain along with a pause button if you want to stop the song. You will need to use Spotlight to stop the song because the media control keys at the top of, say, a Macbook’s keyboard do not work when playing a song in Spotlight.

See also: How to Share iTunes Library on A Home Network
Also, you cannot queue up multiple songs or an album or a playlist in Spotlight but must play songs one at a time. For times when you want to listen to a song or two from your vast iTunes library, however, using Spotlight search is the quickest and easiest way to go.

Source: Cnet
iTunes Alternative —– Syncios Free Mobile Phone Manager


Support to transfer, edit, backup, manage, view iOS & Android mobile data: Music, videos, photos, apps, ebooks, contacts, messages and more.
Download videos from 100+ video sharing sites up to 4K HD video quality and transfer to iPad/iPhone/iPod/Android.
Massive free resources: videos, wallpapers, ringtones
Handy toolkit: Audio converter, video converter, ringtone maker, etc.
Free

Go to learn more>>


You can follow Syncios on Twitter,Facebook for more tips and tricks.

Thursday, February 18, 2016

Apple fixes 'Error 53' and apologizes to customers for bricking iPhones

1-11

Apple is apologizing — and fixing — the "Error 53" bug that left some iPhone devices bricked.

The basic problem occurs if your iPhone 6 or 6 Plus home button is repaired anywhere other than an Apple Store or Apple-authorized repair center.

At first, the phone might work — with everything, including Touch ID, seeming perfectly fine. But then, when you try to update to a newer version of iOS (or you attempt to restore your phone from a backup), the software checks to make sure the Touch ID sensor matches the rest of the hardware. If it doesn't find a match — and only authorized Apple repair centers can pair a phone and Touch ID sensor — your phone will stop functioning.

Although Apple originally said that "Error 53" was a security measure, many users questioned why the company would take the measure of disabling an entire phone and not just the Touch ID features. Apple is facing a class action lawsuit over the feature.

In an interesting about face, Apple on Thursday released an updated version of iOS 9.2.1 for iTunes that will fix phones bricked by "Error 53" and prevent future unofficial Apple repairs from bricking phones.

In a statement given to Mashable, Apple said:

Some customers' devices are showing 'Connect to iTunes' after attempting an iOS update or a restore from iTunes on a Mac or PC. This reports as an Error 53 in iTunes and appears when a device fails a security test. This test was designed to check whether Touch ID works properly before the device leaves the factory.

Today, Apple released a software update that allows customers who have encountered this error message to successfully restore their device using iTunes on a Mac or PC.

We apologize for any inconvenience, this was designed to be a factory test and was not intended to affect customers. Customers who paid for an out-of-warranty replacement of their device based on this issue should contact AppleCare about a reimbursement.


Apple also updated its support document for "Error 53" on its website. If you have an iPhone that was bricked by "Error 53," plugging it into iTunes and running the latest iOS 9.2.1 update should restore the phone and get it up and running properly.

Although the new update will fix bricked phones — and prevent a non-Apple authorized repair from bricking phones in the future — there is a security-based caveat — the Touch ID sensor will no longer work.

That's because the Secure Enclave stored within the Touch ID sensor still needs to be paired and secured. Only Apple and Apple-authorized repair shops can do this.

What this means is that if you do replace your home button on an iPhone 6 someplace other than an Apple Store — you no longer need to worry about your phone bricking. Still, doing this will mean that you will be unable to use Touch ID on the phone.

Source: Mashable

Read more:
HOW TO BLOCK UNKNOWN OR PRIVATE CALLERS ON AN IPHONE 6?

Wednesday, February 17, 2016

Any Video Converter 5.9.1 Supports NVIDIA NVENC Encoding and HEVC/H.265 Standard

video converter tool

Any Video Converter series adopted the NVIDIA NVENC video encoding and HEVC/ H 265 video compression technology to optimize video converting speed and quality.


Any Video Converter, an all-in-one video converter, DVD converter and editor, video recorder and video downloader, submitted its new version 5.9.1 on January 28th, 2016. Three versions for Windows system (Free, Pro and Ultimate) are all included in this update. NVIDIA NVENC video encoding technology is applied to accelerate the speed of converting process. The implement of HEVC/H.265 video compression standard can also deliver significantly better visual quality to users.

NVIDIA NVENC accelerated encoding


Any Video Converter series software (version 5.9.1) leverages the NVIDIA Encoder (NVENC) API to access the high-performance H.264 hardware video encoder introduced in graphics cards with the Kepler GPU architecture. NVENC-based video encoding is faster and consumes less power than legacy CUDA-based or CPU-based encoding.

Please note the Nvidia NVENC needs to be supported by the device driver.

High Efficiency Video Coding


High Efficiency Video Coding (HEVC), also known as H.265, a video compression technology providing twice efficiency of the previous standard, H.264 / AVC. Any Video Converter adds this technology to enable video to be converted to a file that is about half the size (or half the bit rate) of AVC. On the other side, when converted to the same file size or bit rate as AVC, it offers the higher level of picture quality. That will be much easier if you want to convert 4K/Ultra HD videos, 4K Blu-rays, and more.

These two features are undoubtedly the great progress in improving video converting process. However, technology moves on, fashions and the demand for technology may change. Hence, any feedback from you will be appreciated.

All versions of Any Video Converter are available on AVC website. Get more details from: http://www.any-video-converter.com

Read More:


How to download YouTube music to iPhone
How to download 4K video to iPhone
How to Backup & Restore Android Devices
How to Backup and Restore WhatsApp History Chats on Android

Tuesday, February 16, 2016

Don’t Try This At Home: Destroy an iPhone by Changing the Date


Every once in a while an awful bug is discovered that can crash an iPhone, render it nearly useless, or rarely, worse. The worst scenario applies here, because it turns out you can completely destroy an iPhone and make it inoperable by simply changing the devices date to a specific time and date far in the past.

We’re going to show you how this date trick works to destroy an iPhone so that you can avoid it yourself. Absolutely do not try this yourself, do not set the iPhone clock to January 1 1970 under any circumstances, it will break any iPhone. It will supposedly also brick any iPad or iPod touch as well, so do not try it on any iOS device.

Do not try this yourself, you will ruin the iPhone. That can’t be made more clear, if you try this, you will ruin the iPhone. In other words, do not try this yourself with any iPhone that you care about, unless you don’t mind sending it back to Apple for repair. Doing this will destroy the iPhone and make it inoperable. That means you won’t be able to use the iPhone at all, it will be broken. So we repeat, again, do not try this yourself. Do not try this at home. Do not try this with your iPhone. Do not try this with your friends or anyone elses iPhone. And most importantly, don’t be fooled into trying this by someone else, as there are several ridiculous pranks in the form of various claims circulating on the internet as to what happens if you set the iPhone date far into the past – don’t do it, it breaks the iPhone. This is often referred to as a bricked phone, because the iPhone becomes as useful as brick.


Do Not Try This, It Will Brick the iPhone

What not to do: All that is required to brick the iPhone is to set the clock back to January 1, 1970. This is done through the Settings app > General > Date & Time, disabling Automatic, and setting the clock manually to January 1 1970. Then, turn the iPhone off and again or force restart it. The iPhone, iPad, or iPod touch is now bricked. That’s it. The iPhone then boots back up and gets stuck on an  Apple logo screen, unable to do anything else. It’s completely stuck and the device becomes unusable.

Don’t do this:


You’ll get stuck on this, the iPhone becomes useless:


This is quite obviously a bad bug, and though it’s unlikely that average users will attempt to set their iPhone clock back to the Woodstock era, there have been various pranks and claims surfacing on the internet that try to trick people into setting their clock way back into the 1970’s. Don’t fall for it.


Help, My iPhone is Bricked By the 1970 Date Bug! What Do I Do?

Apparently there is one reliable way to remedy this bug if your iPhone has turned into a brick because of the date: take the iPhone to Apple for repair. That’s it, definitively this works, and Apple will take care of it – apparently what they do is reset the battery, which fixes the clock… which leads us to the next possible method.

Another approach to fix the brick date bug, if you have the tools, screwdrivers, and patience to do it, is to open the iPhone up and disconnect the battery briefly, then re-connect the battery and put the iPhone back together. This works because it resets the internal clock on the iPhone away from the 1st of January 1970 Unix epoch brick date. That is obviously not going to be a solution for everyone, however.

Some users report that placing another active SIM card into the iPhone can make it work again as well, but given the uncertainty of that it would not be advised to rely on the SIM card approach to fix the bricked iPhone.

Interestingly enough, the typical method of fixing an iPhone stuck on the Apple logo with DFU restore does not work, which is why the iPhone must be taken into an Apple store to fix.

So, now that you’re aware of this awful bug, whatever you do, don’t try this at home with any of your iOS devices! If you happened to encounter this bug or did it anyway, let us know in the comments what method you used to resolve the problem!

Source: OSXDaily

Read more:
How to Factory Reset iPhone (Any Generation)

Monday, February 15, 2016

How to Record an iPhone Screen with QuickTime in Mac OS X


If you would like to capture and record the screen of an iPhone, iPad, or iPod touch, you can easily do so thanks to QuickTime, the video app that comes with every Mac. This offers a simple solution for recording the screen of an iOS device for demos, presentations, tutorials, and much more, and it’s remarkably simple to use.

To get started capturing a video of an iPhone or iPad screen with QuickTime, you’ll need a USB cable, and want to be running a modern version of OS X on the Mac, and a modern version of iOS on the iPhone or iPad. Specific requirements and an alternative approach for older versions are discussed further below. But since most users already have all that is necessary on their Mac and iPhones right now, let’s jump right into recording the devices screen.


How to Record an iPhone / iPad Screen on Mac with QuickTime

1. Connect the iPhone (or iPad / iPod touch) to the Mac with a USB cable
2. Launch QuickTime Player in OS X, as found in the /Applications/ folder
3. Pull down the “File” menu and choose “New Movie Recording”


4. At the video recording screen, hover the mouse over the active window so the record and volume controls are visible, then click on the little arrow next to the red record button to show the camera and microphone recording options – from this list choose the name of the connected iPhone for ‘Camera’ and for ‘Microphone’*


5. You’ll now see the Movie Recording screen turn into the iPhone, iPad, or iPod touch screen, unlock the iOS device as usual and the Home Screen will display on the Mac screen ready to record, when you want to start recording the video click on the red Record button


6. To stop recording the iOS device screen, you can press the Stop button in the upper right menu bar of the Mac, or hover over the video and choose the Stop button (what the record button turns into)
7. If desired, trim down the video in QuickTime, otherwise save the screen recording by going to the File menu and choosing “Save”


That’s all there is to it, the saved iPhone screen recording will be a .mov video file. Opening the .mov file will default to launch in QuickTime, but you can edit the video in QuickTime, iMovie, Final Cut, convert it to another video format, upload it to share online, embed in a presentation, or whatever else you want to do with the screen capture.


* If you want to record the audio directly from the iPhone, choose the iPhone as the ‘Microphone’ source input as well, otherwise the video capture will come from the iPhone screen but the microphone will record from the Macs built-in mic.

The screen video captured on modern devices is high resolution, on new iPhones that is 1080 × 1920 resolution in vertical mode, and 1920×1080 in horizontal.

For longtime Mac users, you may recall that it’s also possible to record the Mac screen with QuickTime too, a handy feature that has been available in OS X for quite some time. The introduction of the ability to record connected iOS device screens is much newer, however, and it’s sort of a hidden feature that is often overlooked. There’s even a built-in audio recording feature in QuickTime if you just need to capture some audio, even audio from the iPhone or iPad microphone.

The tutorial demonstrates mirroring and recording an iPhone 6S Plus screen with iOS 9.3 on a Mac with OS X El Capitan 10.11.4, but it will work with any other iOS device or Mac as long as the basic system requirements are met. The iOS device must be running a modern version of system software at version 8 or newer, and the Mac must be running a modern version of OS X at version 10.10 or newer. If you do not meet these system requirements or are running prior versions of system software on the Mac or iOS device.

Source: OSXDaily

Read more:
How to Move Photos from Camera Roll to Album Freely

Monday, February 1, 2016

How to Rotate Videos in Mac OS X


Have you ever had a video that was recorded vertically or sideways, and you wish it was orientated either horizontally or otherwise rotated? This is often the case with videos recorded on iPhone or Android phones shot with the notorious Vertical Video Syndrome, but the technique we’ll demonstrate works to flip or rotate any movie, even if it’s not from a smartphone.

Perhaps the best part of this is that with Mac OS X you can easily and quickly rotate any video or movie file without requiring any added software to do so, as the feature is built directly into the OS X video viewing app QuickTime. It doesn’t matter if the video has been recorded as 4K, HD, or standard, slow motion or regular speed, or whether it’s your own video or another movie file from elsewhere.

How to Rotate or Flip Videos in Mac OS X

This works to rotate or flip any video or movie file in Mac OS X, the newly rotated video will be saved as a new video file and will not override the existing movie unless you give it the same name.
1. Open the video or movie file you wish to rotate into QuickTime Player in Mac OS X


2. Go to the “Edit” menu and choose one of the following rotation options for the video:
  • Rotate Left (90 degrees)
  • Rotate Right (90 degrees)
  • Flip Horizontal
  • Flip Vertical


3. Save the newly edited rotated video as usual by hitting Command+S or by going to File and “Save”


As you may have guessed, to rotate a video 180 degrees or 270 degrees, you’d simply apply the 90 degree rotation two or three times.

The newly saved video will be have the orientation defined in the prior save process, whereas the original video will be preserved with whatever orientation it had to begin with (vertical or horizontal, flipped or not).

This is a handy trick if you come across a video that is recorded the wrong way with orientation off, as is sometimes the case with movies captured from cameras and smartphones, and it offers a simple way to correct any video file that is wrongly arranged or would just be better viewed in another orientation.

Certainly a nice feature for flipping and re-orientating videos, though unless you’re an avid videographer it may get less use than rotating pictures which are frequently situated wrongly as well.

Source:OSXDaily


You can follow Syncios on Twitter, Facebook for more tips and tricks. Recommend: if you would like to backup your iPhone/iPad/iPod Touch data to the PC, just go here to learn more. Simply download the free version and have a try, it can transfer data between iOS device and PC freely and easily.
  Download free syncios